

Introduction
At TMC we take hundreds of photos every month and send these across our worldwide customer base. We are extremely passionate about our fish and invertebrates and want to ensure our customers are able to see what we see whilst enhancing their buyer experience in the best way possible.
Over the years we have learned many useful tips and thought it would be beneficial to share some of what we have learned with you.
Preparation is key
Before taking pictures, it is important to prepare a few things which will make the process easier.
Clean tank
It is important to have a clean tank, especially the glass you are photographing through. Ensure you give the inside and outside of the glass or acrylic a good wipe down before starting. This will greatly affect the quality of your pictures later. Another option, that works particularly well in shallow tanks is to photograph from the top down which can be effective for corals and avoiding the glass altogether.
Reflections
To avoid reflections on the glass it is best to keep the room lights turned off, this also has the added benefit that the fish don’t see you as easily and are less skittish.
Water movement
It is also a good idea to turn off any pumps, this will mean that the fish will swim slower and inverts will move less making it easier to take pictures.
Lighting
Having good tank lighting is important, this has several benefits; it helps reduce reflections if the inside of the tank is brighter than the outside. You will be able to use a faster shutter speed (more on that later) and the animals will look their best under the right light. This may include using blue light for certain animals to bring out their bright colours. If it is possible, try to have a black background behind the tank/animal as it will help make the animal stand out more.
Camera Set Up and General Tips
Type of camera
It doesn’t matter whether you use a phone or a DSLR the following guidelines apply to both. These days phone cameras are so powerful it is hard to notice the difference, especially on small mobile screens where most pictures are viewed these days. When setting up the camera make sure to turn the flash off. The flash will frighten the fish causing them great stress and to dart around the aquarium making them harder to photograph. The flash will also cause extra reflections given the wrong angle and will make everything look unnatural.
Aperture
Most of the time you want your subject to stand out and be recognisable. To do this a blurry background is ideal as the sharp animal will stand out instantly. To get this effect you open the aperture as wide open as possible (somewhere between f2 and f5.4), this will also have the added effect of letting in more light and you can use a faster shutter speed. The white balance is the colour temperature of the picture, this varies depending on the colour temperature of the lights. It is best to try out different settings to see which works best as there are so many different variations. Too cold and the picture will look very blue and too warm it will look very yellow, a good starting point is fluorescent (3500K) setting and adjust from there. If you have the possibility to shoot in raw format do so as the white balance can be adjusted later. The ISO should be high enough to have a quick shutter speed if needed but not too high as this will make the picture look noisy/grainy.
Stabilisation
A tripod can also be a great addition, it will help to stabilise the camera with shutter speeds under 1/100 sec. A tripod is also very helpful for doing close up macro shots as you can take your time to pinpoint the focus and get the exact framing. A great addition when doing close-up photos is a macro lens or alternative. This will allow you to get even closer to your subject and get more detail. A good macro lens would have a focal length of around 90mm which allows you to zoom in a bit and have a macro conversion of 1:1. There are also clip-on macro lenses for phone cameras. Other cheaper options for DSLRs apart from a dedicated macro lens are macro-rings and macro-reverse rings which allow you to use your existing lenses.
Get as close to the glass as possible when taking photos as this also reduces reflections. Keep the camera parallel to glass as this also reduces reflections. If using a phone, you can push your fingers against the glass to stabilise it this also works for video.
After taking the photos it is a good idea to check a couple of things to make sure the images are good. The most important thing is that the right part of the image is sharp. It may look sharp at first sight, but it is best to zoom in to be sure and retake picture is needed. Another thing to look out for is the brightness because we are taking pictures in a dark room and looking at a bright screen the brightness can look wrong. It is best to look at the histogram if you have one, this will give a graphic representation of the brightness. There is no right shape, but it is ok if it doesn’t touch the left and right edges as this means there are no blown out highlights or detail lost in the shadows.
Fish
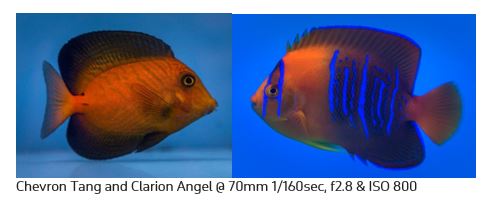
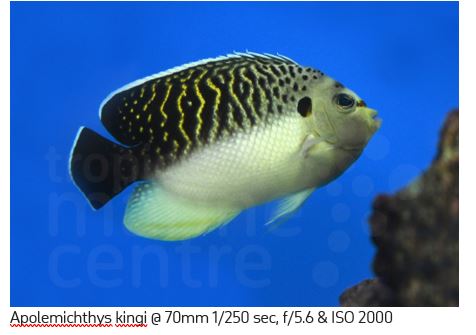
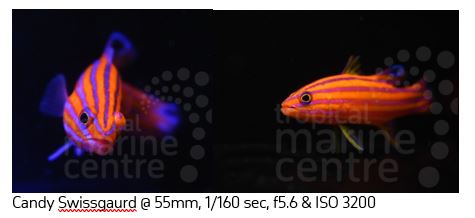
A good time to take pictures is in the morning when the lights come on as fish are not feeding and calmer after waking up. Fish are harder to photograph than corals as they are constantly moving around the tank. Because of this, we need to have a fast enough shutter speed, so the fish, or part of it, is not blurred. Depending on how quick the fish move using a shutter speed of 1/150+ sec should freeze the action but 1/1000+ sec is better. Use continuous focus which will always track the fish and keep it in focus. It is important to focus on the eyes, the rest of the image can be unsharp as long as the eyes are in focus and sharp. Check for sharpness (eyes must be sharp) after taking pictures by zooming in to be certain, it is easier to retake the picture now than to try and sharpen it by editing or having to go back and take it again at a later stage. If it is possible to control the aperture a wide aperture will only have a shallow depth of field, a smaller bit of the picture will be in focus and the background is blurred which makes fish stand out nicely. Something in the region of f3.5-f5.6 is a good starting point. If you want more in focus choose a narrower aperture of around f11. Depending on how bright it is I start with 1/500 sec, f 5.6 & ISO 1000 and adjust it to suit.
Corals
Corals are much easier to photograph as most of them don’t move or only move very slowly. A tripod can be very useful as it allows you to position the camera and get the ideal framing of a coral. Once it is fixed in place the focus can be fine-tuned manually to get the exact part of the coral in focus that you want sharp. The aperture can also be adjusted to get more/less of the coral in focus. Another advantage of using a tripod is that a low shutter speed can be used if the coral doesn’t move. When using a tripod, a remote or shutter delay can be used to ensure there is no camera shake when the picture is taken. With a low shutter speed, enough light is collected so the ISO or aperture, can be lowered making a cleaner image. It is also possible to photograph corals from the top down. The flow needs to be turned off and the surface as still as possible to get a sharp shot when shooting through the surface, but this can be a great method for getting symmetrical top-down pictures. A macro lens can also be very useful for photographing corals as this allows you to get even closer and more detail in the picture.

Editing
There are several options for editing your pictures after you have taken them. Even if you don’t edit the picture the camera/phone will put its own pre-set on the image to give you the jpeg picture. So, it is better to do it yourself to get the most out of your pictures. This can be done using anything from a simple free phone app to a highly sophisticated computer program like photoshop. Editing on a phone is great as it is quick and easy, and you usually have the picture on your phone already in any case. A great free app that I use is called “snapseed”, it has a great range of tools which can be used to improve the picture. If using a DSLR I would normally use Adobe Lightroom to do basic editing and Adobe Photoshop for a few extra bits. One of the hardest things to get right is the white balance, to make it look as natural as possible, I increase the saturation to see which colours are over dominant and adjust the white balance to even it out as much as possible, then reduce the saturation down to 0 again. Once the white balance is set, I begin by balancing out the overall picture by increasing or decreasing the exposure a bit and lowering the highlights and brightening the shadows. I then increase the whites to give it a bit of pop and adjust the contrast. I add a small amount of clarity and sharpness but not so much that it is obvious. If the picture is busy, I will darken areas I don’t want to stand out using local adjustments like a brush.
We hope that you’ve found the above notes from our in-house photographer helpful. Feel free to add your own photography tips in comments.